How to Make Stamped Brass Gift Tags or Labels
Hi, everyone! It’s Jordan and I’m back to share a quick & easy brass tag DIY that is perfect for holiday gifting & decorating. These are a fun & unique way to label your gifts and stockings- or to use as custom ornaments or place holder napkin tags. Over the years I’ve found a bunch of ways to use them around my house, so be sure to save this tutorial for future projects beyond the holiday season! Click through for a simple tutorial on how to make stamped brass gift tags or labels…
It’s been a few months since I’ve popped up here on the blog, so if you are interested in other projects I’ve shared, you can take a look at my brass chair makeover, decorative pedestal DIY, or this DELICIOUS cinnamon roll recipe (seriously, you have to try these this season)! Sarah asked me to share this fun tutorial while she’s out sick this week.
Ideas for Styling & Using Brass Tags

I first purchased the supplies to make these tags a few years ago & used them to label gifts and stockings while decorating for the holidays. Since then, I’ve used them all around the house for various organization and crafting projects. I even labeled a spare house key to give to my parents in case of emergencies. There are so many uses! Here are some quick ideas for using these custom brass tags…
- Gift tags
- Key chains
- Stocking labels
- Home lockers or backpacks
- Organizing cabinets & pantries
- Dog collar identification
- Hosting place cards
- Utility shut-off labels
- Emergency back-up key label
- Travel bag tag
- Customized ornaments
- Herb garden tags
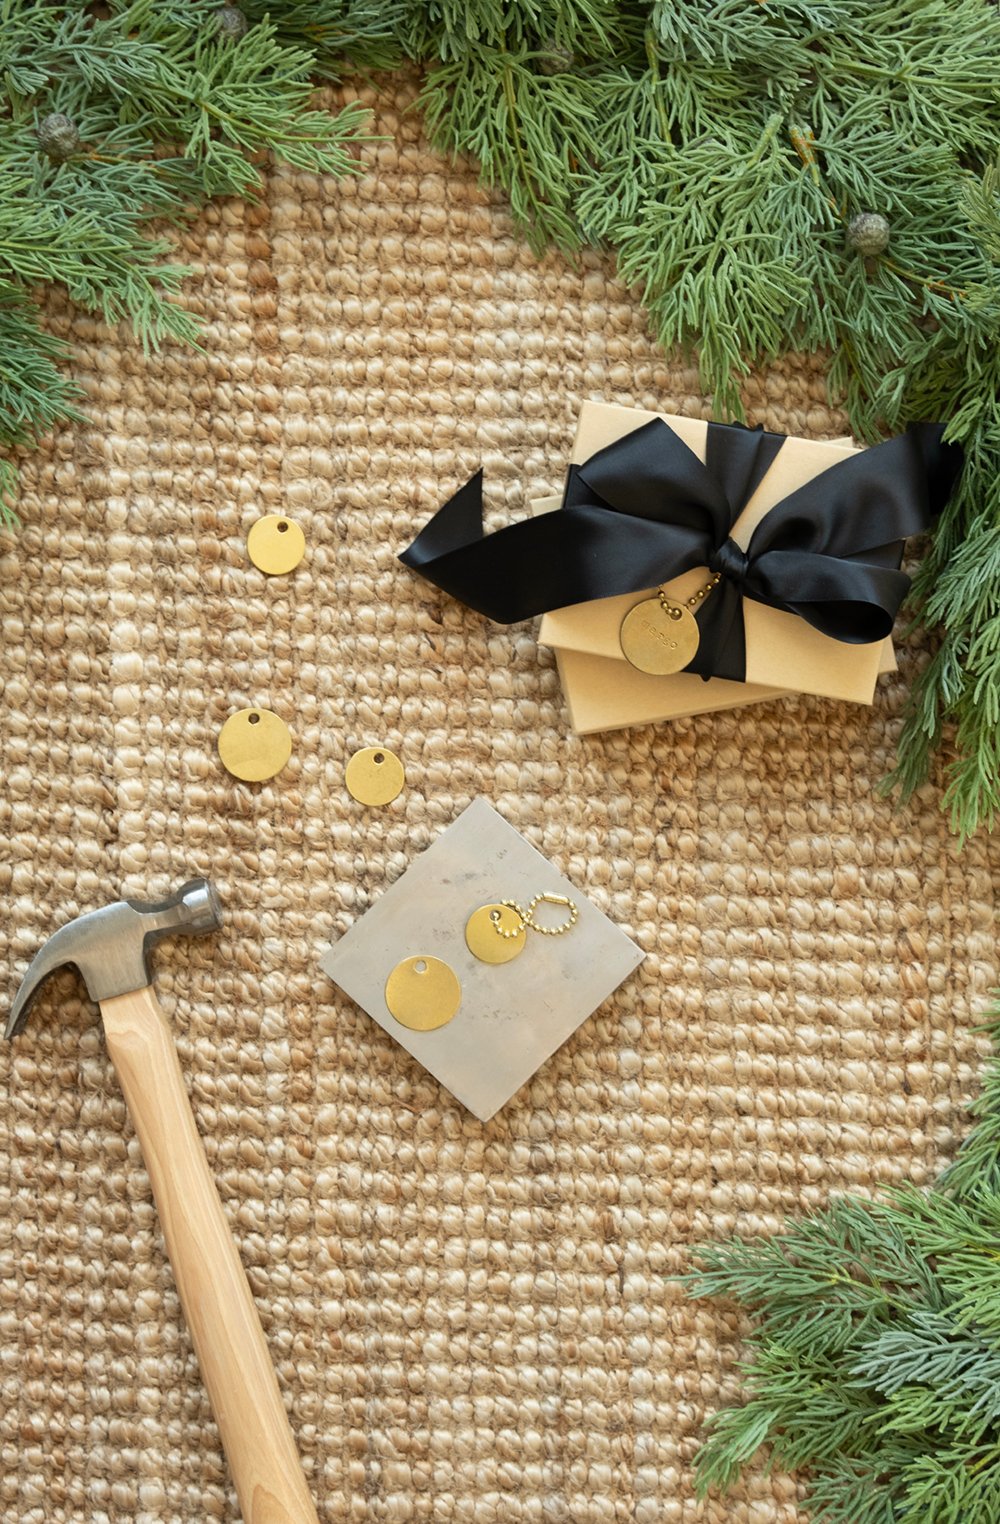
Supplies

- Steel bench block (or a scrap piece of wood)
- Brass tags (1 inch round or 1.25 inch round)
- Brass split key rings
- Brass ball chain
- Brass screw key rings
- Hammer
- Metal stamp letter set
- Washi tape
Step 1: Select Letters & Layout

First, I select the letters (and/or numbers, punctuation, symbols, etc) I’ll be using and decide where they’ll be placed on the tag. I usually center the letters, and for longer phrases or addresses, I may need to split the stamps into two or three rows.
Step 2: Secure the Tag

Then I tape the tag into place on my steel bench block. If you don’t have a bench block, you could also use a scrap piece of wood- a thicker piece, like a 2×4 would be best. I like to use washi tape to secure the tag because it is easy to move around without leaving a residue. The tape keeps the tag in place, and also acts as a guide to keep the letters lined up straight. If I’m doing multiple rows, I readjust the tape with each row of letters.
Step 3: Stamp

I start stamping my letters from the center and move outwards. So when Stamping J – O – R – D – A – N, I start with the R & D (splitting the center), then stamp the O & A, and end with J & N. Hold the stamp steady, and hit it once (hard!) with the hammer to avoid double stamping.

FAQ
Yes! I was introduced to metal stamping at a summer camp in middle school and it has so many uses beyond just name tags. You could stamp metal bookmarks with quotes, metal stakes with plant names, or larger tags as ornaments!
Yes! Other than brass you can find silver, copper, and even black & bronze options- in varying shapes.
Anything you want! If you use them to gift to someone in your household, you can alway reuse them again next year. Otherwise, they can be thrown on a key chain, work bag, makeup pouch, or necklace! I attached one to a gift I gave Sarah a few years back, and she still has it on her car keys.

Related
Looking for more holiday inspiration or quick & easy organization projects? I’ll link some of my favorites for you below…
- Classic Monochromatic Gift Wrap
- DIY Food Gifts & Packaging Ideas
- Winter Tradition: Holiday Cards
- Holiday Gift Wrap Ideas
- 2024 Holiday Gift Guide
- Jordan’s Holiday Home Tour
- Refrigerator (& Kitchen) Organization

I hope you found this helpful or inspiring! If you end up making your own metal stamping crafts, let me know…I’d love to see them! Here’s to a wonderful weekend ahead. Have you started decorating for the holidays yet?
